DigitalOcean Apps Platform
Deploy rtcstats-server on DigitalOcean Apps Platform in two stages: boot it, then make it keep your data.
You have a WebRTC app sending data to rtcstats-js. Now you need rtcstats-server somewhere your clients can actually reach. Not your laptop. Not a Docker container on a colleague's machine. A real URL with HTTPS that stays up.
DigitalOcean Apps Platform is one of the simplest paths to get there. It picks up your repo from GitHub, runs the buildpack, and gives you a *.ondigitalocean.app hostname. This guide walks the deploy in two stages: first it boots, then it does something useful. We won't pretend the first version is production-ready. It isn't. We'll be honest about what's missing as we go.
Before you start
You need:
- A DigitalOcean account
- A GitHub account (Apps Platform pulls from GitHub by default)
That's it. No Docker installed locally. No Kubernetes. No Terraform.
Stage 1: get it running
Stage 1 is the smallest version of "running." You set one environment variable. The buildpack does the rest. The result is a server that boots and accepts connections - but isn't actually useful yet. We'll fix that in Stage 2.
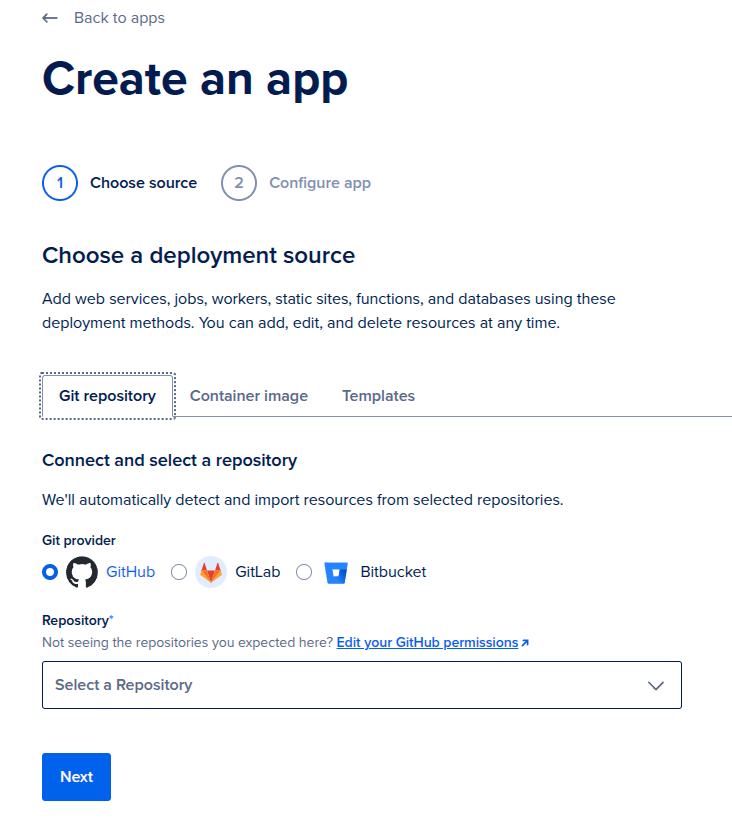
Step 1: choose your source
In DigitalOcean, click Create App and pick Git repository.
- Git provider: GitHub
- Repository:
rtcstats/rtcstats - Branch:
main - Source directory: leave empty. The build command runs from the repo root and targets the workspace.
- Autodeploy: OFF. This is a server you deploy and forget. You don't want a
git pushto main to silently redeploy production.
Click Next.
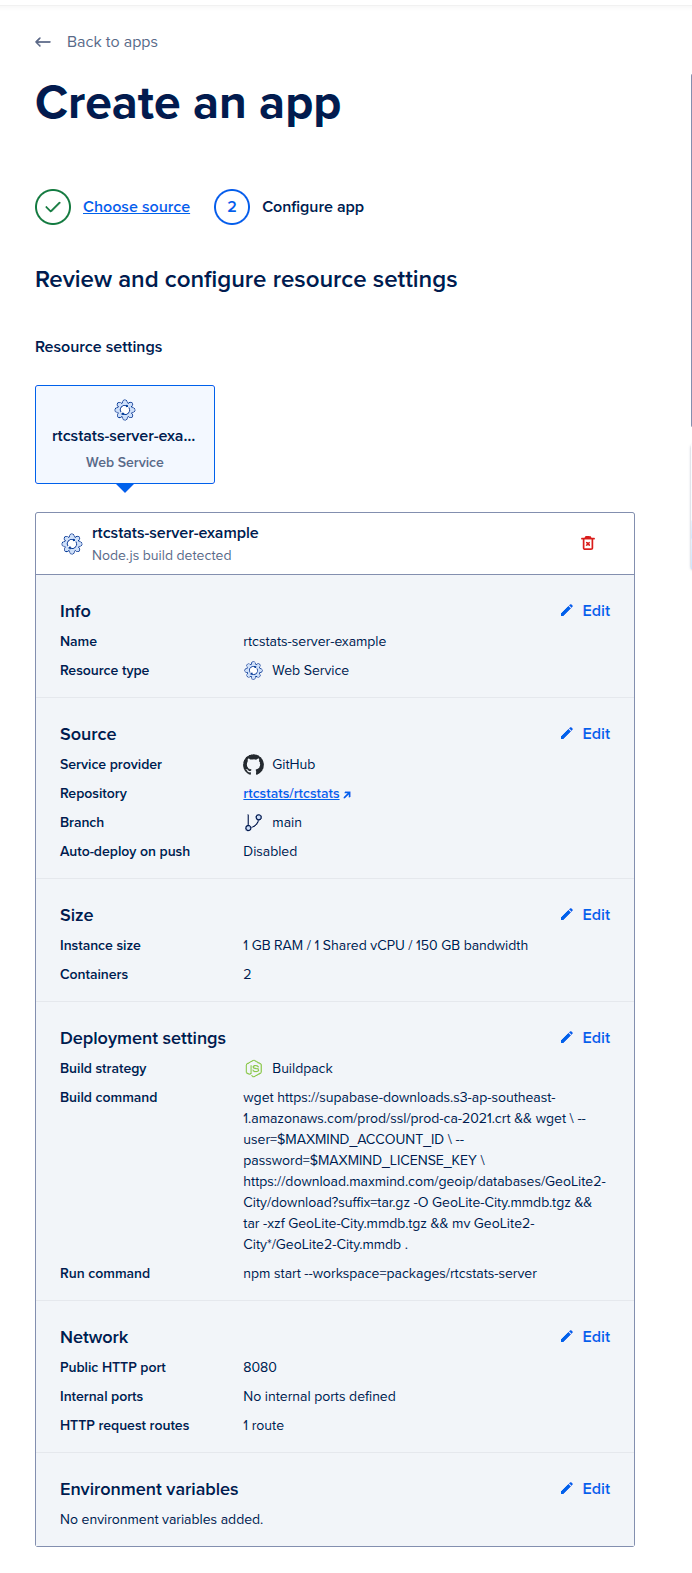
Step 2: configure the service
- Resource type: Web Service
- Detected runtime: Node.js (the buildpack auto-detects)
- Size: start with the smallest tier. 1 GB RAM, 1 shared vCPU. You can scale up later from real load, not from anxiety.
- Build strategy: Buildpack
- Build command: leave empty for now. You'll add one later if you enable GeoIP enrichment.
- Run command:
npm start --workspace=packages/rtcstats-server - Public HTTP port: 8080
The 8080 default comes from config/default.yaml:7 (httpPort: 8080). Match it on both sides or both will be wrong in different ways.
The workspace flag in the run command is what lets you start the server from the monorepo root.
Step 3: add a health check
- Type: HTTP
- Port: 8080
- Path:
/healthcheck
rtcstats-server exposes this endpoint at packages/rtcstats-server/rtcstats-server.js:94. It returns 200, no auth required. Use HTTP, not the default TCP check. TCP only confirms the port is open. HTTP confirms the app is actually serving.
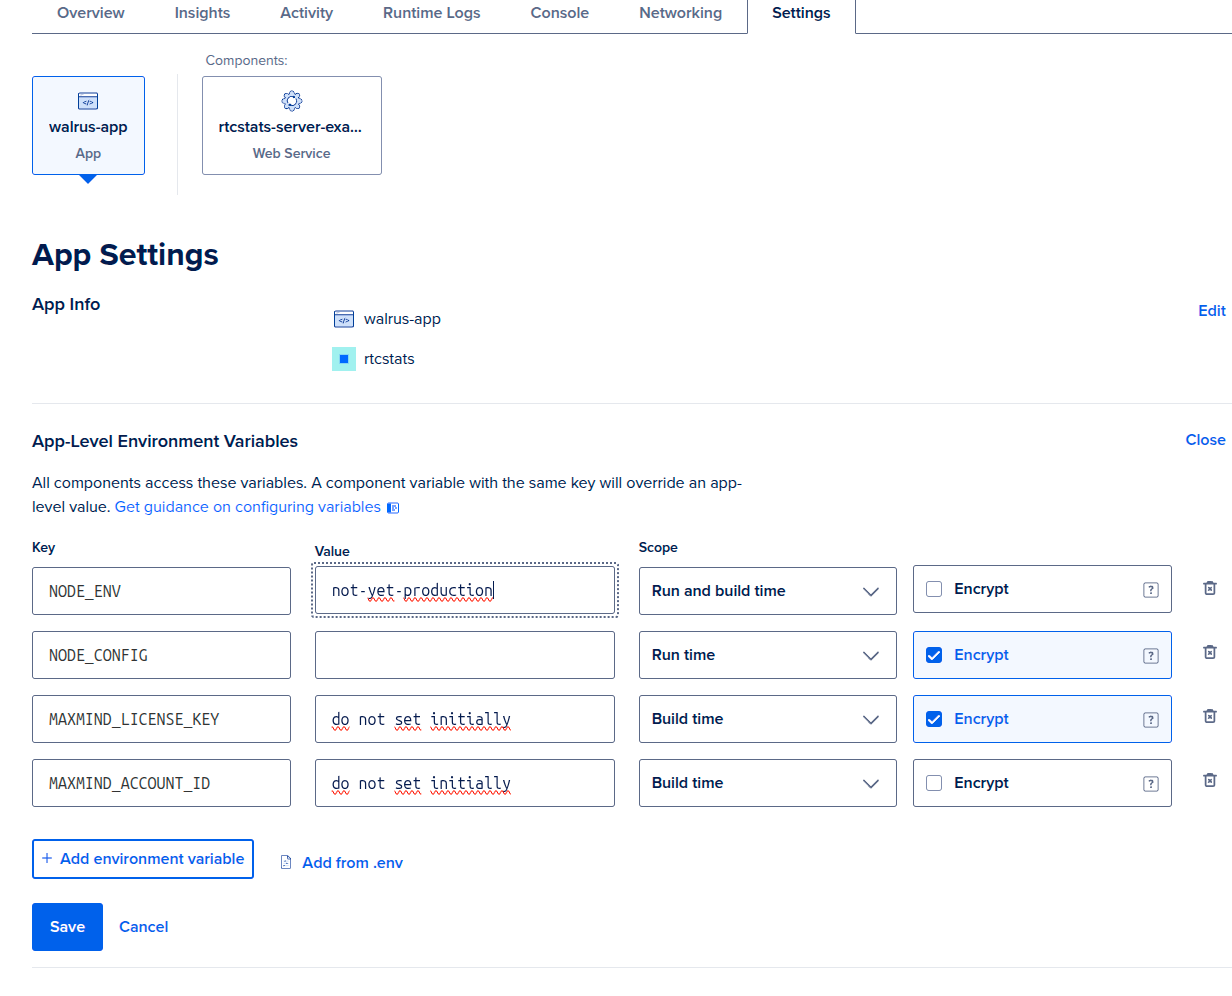
Step 4: add one environment variable
App-level environment variables, one row:
| Key | Value | Scope | Encrypt |
|---|---|---|---|
NODE_ENV |
not-yet-production |
Run and build time | No |
That's the whole environment for Stage 1. Pick any value that reminds you this deploy isn't real yet. We use not-yet-production because it shows up in screenshots and reminds future-you what state this app is in.
Click Create Resource and let it deploy. You'll get a URL ending in .ondigitalocean.app. Hit https://your-app.ondigitalocean.app/healthcheck. You should see a blank 200.
That's Stage 1. The server is up. It's also, right now:
- Not enriching anything with GeoIP (no MaxMind data)
- Stores dump files on the servers hard disk.
- Not authenticating any clients (anyone with the URL can post data)
We're going to configure persistence in Stage 2. GeoIP enrichment is covered in How to enrich rtcstats-server with GeoIP data. Auth is covered at the end of this page - and it's the most important one before you point real traffic at this.
Stage 2: make it keep your data
Gathering dumps from your clients and storing them in object storage is what rtcstats-server is built around. Stage 2 wires up the storage half of that - a bucket the server can write each finished dump into, and credentials for the upload.
DigitalOcean Spaces is the natural fit here: it's S3-compatible, lives in the same dashboard as your app, and the AWS S3 SDK that rtcstats-server uses talks to it without modification. Pointing the server at a Space is a few minutes of clicking and one environment variable.
Step 1: create a Space
In DigitalOcean, go to Spaces Object Storage → Create a Spaces Bucket.
- Region: pick one close to your app. The region slug becomes part of the endpoint hostname (e.g.
nyc3→nyc3.digitaloceanspaces.com). Latency doesn't really matter though. - Enable CDN: off. rtcstats dumps are write-once, read-rarely. CDN buys you nothing here and costs extra.
- File listing: Restrict. The bucket should not be world-readable.
- Name: something you'll recognise, e.g.
rtcstats-dumps-prod. The name is global across DigitalOcean Spaces, so generic names are taken.
Note the region slug and bucket name. You'll need both in Step 3.
Step 2: create a Spaces access key
Spaces uses its own access keys, separate from your DigitalOcean API token.
Go to API → Spaces Keys → Generate New Key. Scope it to the bucket you just created, with Read/Write access. Give it a name like rtcstats-server-prod so you can revoke it later without guessing.
DigitalOcean shows the secret key exactly once. Copy both the access key ID and the secret key now.
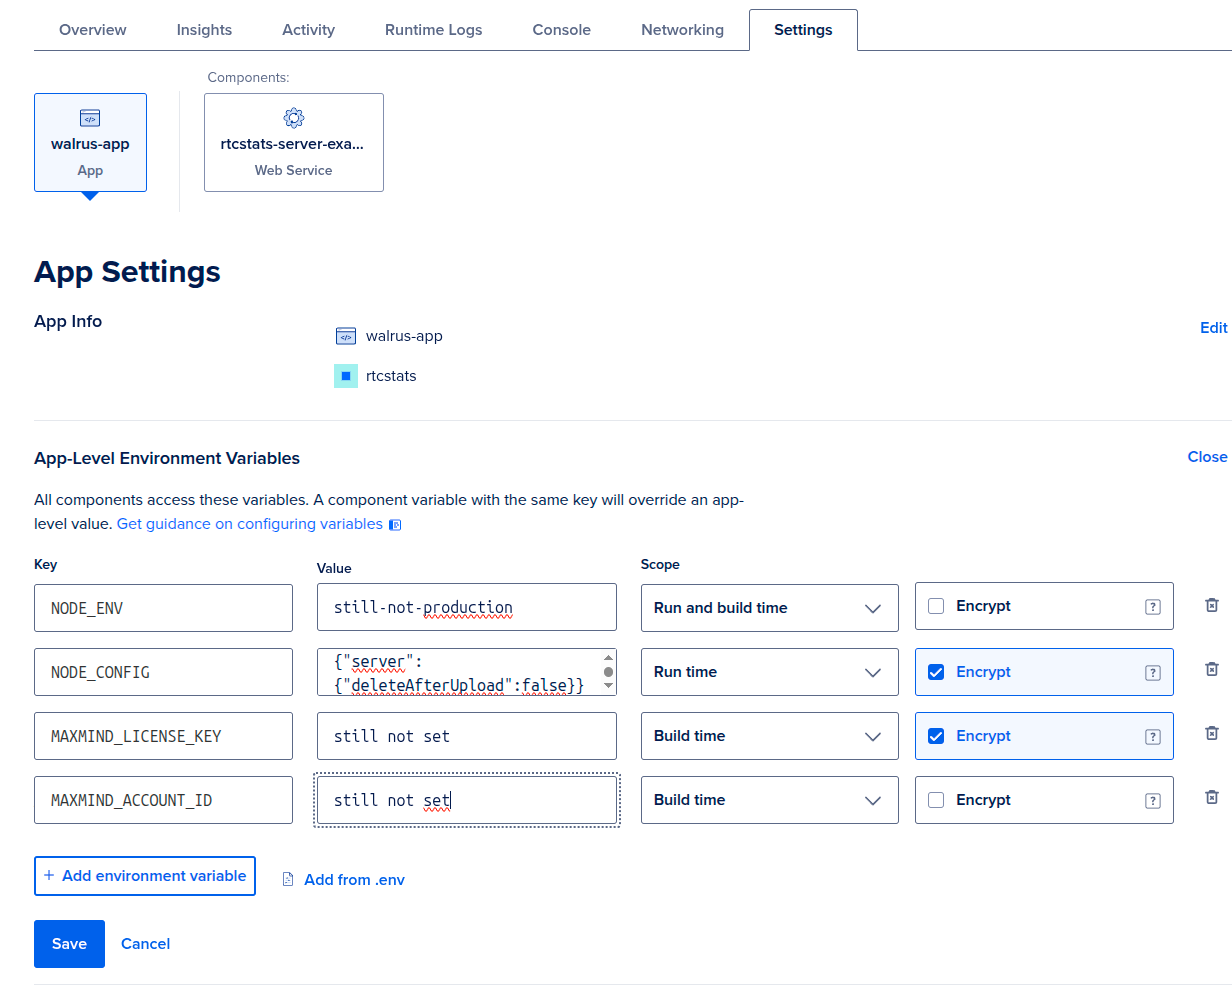
Step 3: configure rtcstats-server
rtcstats-server reads storage settings from the storage.s3 block in config/default.yaml. Override them at runtime via the NODE_CONFIG environment variable - it's inline JSON consumed by the node-config package at boot, and YAML in the repo maps one-for-one to keys here.
Replace the Stage 1 NODE_CONFIG (if you set one) with this. Mark it Encrypt: Yes - it carries the secret key.
| Key | Value | Scope | Encrypt |
|---|---|---|---|
NODE_CONFIG |
see below | Run time | Yes |
{
  "storage": {
    "s3": {
      "credentials": {
        "accessKeyId": "DO00EXAMPLEKEYID",
        "secretAccessKey": "exampleSecretKeyReplaceMe"
      },
      "region": "us-east-1",
      "endpoint": "https://nyc3.digitaloceanspaces.com",
      "bucket": "rtcstats-dumps-prod"
    }
  }
}
Two things worth calling out:
regionisus-east-1regardless of where your Space actually lives. Spaces ignores the region for routing - theendpointdoes that work - but the AWS SDK refuses to sign requests without one, andus-east-1is the safe default.endpointishttps://<region-slug>.digitaloceanspaces.com, not the per-bucket URL DigitalOcean shows you. The SDK appends the bucket name itself.
forcePathStyle is left at the default (false). Spaces supports virtual-hosted style; only flip it on for backends that require path-style (Supabase Storage is one).
Step 4: verify dumps land in the Space
Save and redeploy. Connect a client over the websocket (the default transport) and let it disconnect. Watch the Runtime Logs tab for a line like:
Connection with uuid <uuid> disconnected, starting to process data
Note the UUID. Then open your Space in the DigitalOcean console - you should see an object whose key matches it. If the bucket stays empty, the most likely culprits are:
- Wrong
endpointregion slug (nyc3vsfra1vssfo3). - Access key not scoped to this bucket, or scoped read-only.
bucketname typo - rtcstats-server logs an S3 error in the runtime logs when this happens.
Before this sees real traffic: lock down auth
Everything above gets you a working rtcstats-server you can poke at. You should make it more robust for production, partially by adding auth. This also doubles as our identifier mechanism.
The configuration in this guide does not set authorization.jwtSecret. From config/default.yaml:
JWT secret key to use for authorizing clients. If not set, no authorization is performed.
In plain English: anyone who finds your *.ondigitalocean.app URL can post data to it. That's fine for a deploy you're poking at. It's not fine the moment real WebRTC traffic starts flowing.
For production, generate a JWT and authorize clients with it. The full setup is documented in the How to authenticate clients with rtcstats-server guide and also think about identifying users and sessions.
Set authorization.jwtSecret in NODE_CONFIG, sign tokens for your clients, and configure rtcstats-js to send them. That's the single change that turns this from "it deploys" into "it deploys safely."
What's next
- How to enrich rtcstats-server with GeoIP data - add country and city data to your sessions
- How to horizontally scale rtcstats-server - when a single instance isn't enough
- How to configure rtcstats-server for privacy - anonymize IPs, strip PII
Was this page helpful?
